Day 3: My book creation process
Because I felt sick yesterday, I ended up sleeping longer than usual—nothing new, I tend to do that the night after a headache or intestinal cramping. But that also means I got started later today. I also have more housework to do today, including making dinner, so I’ll have less time to work before I have to start cooking.
After going for a short walk and then making lunch, I “cleared the deck” again by checking my email inbox. I usually only check it once a day, and sometimes I actually forget to check my email for the day so sometimes it’ll have a couple days backlog. I try to get this stuff done before writing because otherwise it’ll bother me and distract me from writing.
I got an email from my translator about adjusting the formatting for Sushi for One a little more, and I also got the cover back from my graphic designer for the Japanese version of Sushi for One. It looks great! She also went ahead and did the ebook covers for the other two books in the series, Only Uni and Single Sashimi, so that all three covers have the same style and look. The covers look fantastic! She asked my opinion on some titling formatting, and I also sent the cover to my translator to take a look at.
Now that my email and the Sushi for One stuff is out of the way, I can get back to outlining my series. Unfortunately it took a long time, which cuts even more into my writing time today.
It occurred to me while I was walking that I jumped into this diary without a point of reference as to where I actually am in my writing process. This is how I write a book, and other writers will be different:
Stage 1) I usually start with the characters. I write the backstory and family first, and I jot notes in a file in Scrivener as I think about everything that comes to me about them.
This part will often take months, if not years, as a character slowly comes to me. I will work on the characters for a week or two, then put the project away. Then a few weeks or months later, work on it again.
I will usually put off naming them until I know a bit more about them (for the longest time, the four heroines in my Sushi series were Characters A, B, C, and D). Once I have a slight grasp on their personalities and maybe how they look visually, I’ll come up with a name.
I used to be more arbitrary about names and just name a character by going with my gut, but since I started writing Regencies I’ve been more careful about names because it really would be kind of rude to name a character after an actual member of the peerage who might be alive, or whose family might be offended at the fictional character named after their ancestor. I just think about if someone I don’t know named a character Camy Tang who is nothing like me, and I think it would irk me a little.
For my contemporary romances, I don’t have to worry about that, but the process I developed in naming my Regency characters has carried over to this genre, too. I will look at the character’s personality and think up some key words, and then try to find a first and last name that fits those keywords. But occasionally I’ll just pick a name which I like the sound of.
I typically work on the character until I’ve pretty much exhausted that initial bolus of ideas about them. I will usually write a bit on their internal or spiritual conflict, and also the romantic conflict between the hero and heroine.
Stage 2) Next I work on the plot and the external conflict. This is harder for me and I usually get inspiration from outside events or movies or TV shows. I use the Snowflake method of plotting, starting from large scale events and then slowly going deeper into more detail.
For Snowflake step 2 (1-paragraph summary of the book’s plot), I put all the paragraphs for all the volumes in a file in Scrivener titled “1-paragraph summaries.” Then for Snowflake step 4 (writing a one-page synopsis for each book), I put all the synopses in a single file titled “Entire series plot.” When I do Snowflake step 6 (write an expanded synopsis for each book), each book’s expanded synopsis is in it’s own file.
In my Lady Wynwood’s Spies series, I was all over the place in terms of plotting, so I decided to write down what I’ve done so far, so that I know what I need to do:
Volume 1: written
Volume 2: I’ve done through Snowflake step 6 and started on Snowflake step 8 as well as writing a few chapters
Volume 3: Snowflake step 6 is partly done
Volume 4: Snowflake step 4 is mostly done
Volume 5: Snowflake step 4 is only partly done
The rest of the books: I’ve done Snowflake step 2
Yesterday, I was working on Snowflake step 6 on volume 3. However after listing all this out, I realized that I should finish Snowflake step 4 for all the books in the series first so that I have a more comprehensive overview of the entire series. So today, I’ll do Snowflake step 4 on each book in the series from volume 4 on.
Stage 3) After finishing Snowflake step 6, before starting Snowflake step 8, I’ll go back and make sure the book has a cohesive internal/spiritual arc and a strong romantic arc. I plan the spiritual and romantic arcs at this stage so that I can be sure they flow well in the story.
I know lots of romance authors who can’t do this because it’s too much plotting or too detail-oriented, and I totally understand where they’re coming from. But personally, I have a hard time writing the romantic arc in a book without plotting it out, and I can’t edit a romantic arc very well in a written manuscript. So I do this step because I know that otherwise, my spiritual and romantic arcs will be weak and/or disjointed.
Stage 4) I’ll usually make one Hero’s and one Heroine’s Journeys spreadsheet for the series. Each spreadsheet has one column for each main protagonist, and each cell is a stage in the Hero or Heroine’s Journeys. My Heroine’s Journey follows the regular Heroine’s Journey, but my Hero’s Journey spreadsheet is a hybrid of the external events and the heroes’ internal journeys. I have read lots of books on both Hero’s and Heroine’s Journeys, but my favorite is 45 Master Characters, Revised Edition: Mythic Models for Creating Original Characters, and in my spreadsheet I use an adjusted version of her descriptions of each stage of the journeys.
This is to make sure each protagonist’s spiritual journey has a strong arc through their particular book (if each book in the series is a stand-alone) or through all the books in the series (if each book is not stand-alone). I use the spreadsheet as a very broad overview to make sure I have the vital elements from each journey for each character.
Stage 4b) (Updated) If I’m doing a series, at this point I will also fill out a Series Character Overview spreadsheet for each character in the series (or at least for the characters whose books I’ve plotted so far). My Series Character Overview spreadsheet is very simple, but it gives me a quick glance at each of the characters’ external, spiritual, and romantic conflicts.
I have one column that has:
Archetype
Job
Wound/unerasable sin
Background/Ordinary World
Spiritual conflict
Needs to learn
Scripture
Doesn’t want to be with him/her because:
Needs him/her because:
External goal
External conflict
Villain
Inciting Incident
Disaster 1
Disaster 2
Disaster 3
Why am I passionate about this book?
Then to the right of that column, I have one column per character and I fill in those factors. For the “Villain” and “Why am I passionate about this book?”, I will often have the same answer for both the hero and heroine of a single book, but the other cells are usually specific for each character.
My Series Character Overview spreadsheet actually is very much like a combination of Snowflake steps 3 and 5, except in spreadsheet format rather than a paragraph. I also have one file in Scrivener for each of my characters' information, but my Series Character Overview spreadsheet is more of a summary of the main characters in the entire series.
Stage 5) (Updated) At this point, my plotting and outlining goes into overdrive, which is way more than what most writers do. I’ll do Snowflake step 8 and make a scene spreadsheet, and at the same time I usually do some blocking (explained below).
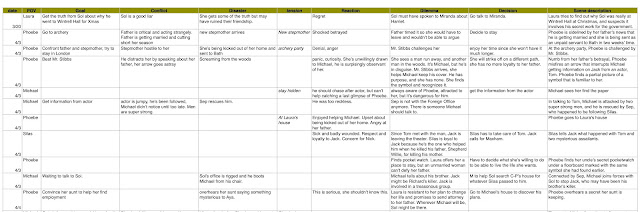
The scene spreadsheet of Snowflake step 8 is an important step for me because I also list what scenes will be in what character’s point of view, and when in the story timeline each scene happens. I will also do an extra step and make sure each Scene has a Goal, Obstacle, and Disaster or, if it’s a Sequel, I’ll make sure it has a Reaction, Dilemma, Decision. (These terms are straight from Dwight Swain’s book, Techniques of the Selling Writer. I also wrote articles on Scenes and Sequels on my Story Sensei blog.)
I do this to make sure each scene has a purpose. I don’t want scenes that are rambling or don’t advance the plot.
I also create blocking notes for each scene (one file in Scrivener for each scene). For my writing process, “blocking” is like blocking in a live play. It’s writing a step-by-step description of the details of a scene—where the characters go, what they do, their internal thoughts, ideas for dialogue, etc.—to make it easier for me to write the rough draft.
The concept is the same as the “beats” described in Write Better, Faster, but I call it blocking because “beats” is sometimes instead used to refer to high-level outlining. Blocking is also mentioned (although she doesn’t call it “blocking”) in 2k to 10k.
I started doing blocking notes because when I’m planning out the scenes for Snowflake step 8, more details about the scene will usually come to mind that would make my scene spreadsheet too cluttered. Instead, I started jotting these details down in a file with blocking notes for the particular scene (which is why Snowflake step 8 is combined with my blocking when going through my Book Creation Process stages).
I used to try to separate the Snowflake step 8 (scene spreadsheet) and blocking step, but when doing the scene spreadsheet, I found that I can’t stop myself from coming up with more details, and I want to write that stuff down so I don’t forget it. So I would tend to always do some blocking while I’m doing Snowflake step 8. So now, when I track my writing time, when I do Snowflake step 8, I list it as “blocking” since I’m likely doing some blocking at the same time.
In the past, I would only do a few scenes in the spreadsheet and then start writing. However, now, I’ve adjusted my process to complete the entire scene spreadsheet and most of the blocking all at once before I start writing. I find that my writing tends to be smoother when I’m only doing the writing and not trying to switch mindset to do the scene spreadsheet or blocking.
Stage 6) At this point, I’ll start writing the book. I got a really nice gaming keyboard, which made a HUGE difference in how smoothly and quickly I type.
Before, I would finish the manuscript and (ideally) wait a minimum of 4 weeks before doing the editing. That way when I get back to it, it’s fresher and I have a clear-minded perspective that can more easily start hacking and slashing if necessary. However, now that I’m my own boss and don’t have a publishing house editor expecting my manuscript, I found I have a tendency to procrastinate doing the self-editing.
It’s because I loathe self-editing. Loathe it.
I discovered that it’s easier for me to get myself to do my self-editing if I do it as I write rather than waiting a few weeks after the manuscript is done. The process has been referred to (by other writers) as cycling, and basically it’s starting your workday by first self-editing what you wrote the day before, then moving on to your writing for the day. You end up with a very clean edited draft rather than a typical “rough” draft.
I also experimented with writing fast (I’ve seen it referred to as “vomit writing”) and just leaving notes for yourself in your manuscript rather than pausing to look things up or come up with a better word or phrase when you get stuck. Some writers don’t even correct typos.
However, I discovered that when I edit something that messy, the editing suffers. I’m so concentrated on fixing all the mistakes that I don’t do things like tweak word choices to eliminate repetition or make the prose clearer, I don’t adjust phrases to make it sound more like the particular character speaking it, or any of those little things that tighten and refine my writing.
So now I’ve been writing at whatever pace I feel I can handle. I edit my writing as I go so that the first draft is very clean (this is even before I do a cycling pass the next day). It makes my writing pace much slower, but I feel like the overall quality of my writing is much better.
This method of writing slowly and editing as I go wouldn’t work for some writers, especially if they have issues with editing too much and spending too much time editing so that they never move forward with their writing. Luckily, I don’t have that problem (it’s probably because I loathe self-editing so much), so I usually only work on a sentence or paragraph just until I feel it’s satisfactory, and then I’ll keep writing.
However, if a writer did have those kinds of compulsive self-editing tendencies, I would suggest doing “vomit writing” and just writing without stopping, without correcting yourself. It really forces you to move forward on the manuscript. It’s a method that worked for me during all the years I wrote for Zondervan, Love Inspired, and Guideposts. However, since I was provided with professional editors at those publishing houses, my poor self-editing skills didn’t impact the final product as much. Now I have to rely only on myself, so I adjusted my writing style.
(Note on dictation: I tried doing dictation several times, and I got it to work for me up to a point, but I didn’t fully commit to it and didn’t get successful and productive at it. At some point I’ll try again, but for now, I’m just typing like normal.)
Stage 7) (Updated) I used to contact my graphic designer about a cover for the book after I finished writing it, but I have discovered that it helps me do my marketing if the ebook cover is done BEFORE I finish the manuscript. So I contact my graphic designer about a cover for the book when I start writing and ask about her schedule, and assuming she’s scheduled me in, I contact her again about a month before I think I’ll finish writing the rough draft. My graphic designer, Dineen Miller, is amazing and knows exactly my tastes, so I always really love the designs she suggests.
On a side note, I think that choosing a graphic designer is a very personal decision. There are other designers who are perhaps cheaper, but Dineen got her degree and worked as a professional graphic designer in the advertising and marketing industry for many years before she started doing book covers, so I trust her professionalism. Also I trust her taste, which matches with mine very well, and a designer who really “gets” me is something very valuable to me. I never have to spend a lot of time going back and forth to tweak a cover I’m not really happy with. She usually gets my concept and taste pretty solidly with the first few comps she comes up with.
Stage 8) After finishing the manuscript, I send it to my proofreader, Judy, who is way more detail-oriented than me. She’s inexpensive but very good.
If I wanted the manuscript to be perfect, I’d send it to another proofreader after the first one is done, and possibly a third proofreader after that, but I just don’t have the money for that. My proofreader Judy does a good job and I personally don’t see any errors after she’s done, which is good enough for me.
Stage 9) (Updated) When I send the book to my proofreader, I start doing as much of the self-publishing busywork as I can ahead of time. I have a huge To Do list that breaks everything down into small, manageable chunks, which also ensures I don’t forget anything important.
In fact, I have also started doing a little bit of marketing every day, and so I do some of the following even before the manuscript is completed. The To Do list helps with that, because I can just do one small task each day.
Even though I’m usually a bit brain-dead the week after I finish a manuscript, I have discovered (the hard way) that it’s much easier to do some of these things (like writing the back cover description) when the story is still fresh in my mind, and the majority of these marketing tasks can be done well ahead of the actual deadline for each task.
By the time the manuscript is done I should have received the ebook cover for the book from my graphic designer. I write the reader letter and back cover description of the book while the story is still fresh in my mind, and I create a page for the book on my website and upload the cover and back cover description. Then I register the ISBN numbers for the ebook and paperback versions, and create a barcode for the paperback cover. I determine the categories and keywords for Amazon (which can sometimes take a few hours).
I usually send a newsletter out the 2nd Wednesday of every month, so I schedule the release date of the book to be announced in the second newsletter I will send after I expect to get the book back from my proofreader. So for example, if I expect to get the book back from my proofreader on March 1st, I’ll schedule the release date for the 2nd Wednesday of April.
I write drafts of my next two newsletters ahead of time. The first newsletter announces the book will be releasing the following month and calls for Street Team signups, and the second newsletter announces the book is released and gives a special newsletter-only discounted sale price, which will go up to normal price in a week’s time.
I put together my media kit for the book, which includes a high-resolution ebook cover, the ISBNs, a link to the book page on my website, back cover descriptions (a long one and a short one), author bio and headshot, an excerpt of the first chapter, and a list of 5 interview Q&As they can use on their blog if they like. I put the media kit on my Google Drive folder and get the shareable link, which I put on the book page on my website. The media kit is a holdover from when I was writing for my publishers, whose marketing department always asked for stuff like that. Some bloggers will use the media kit, so I always have it available in case they want it.
I create listings of the ebook and paperback book on Goodreads so my Street Team can mark it as To-Read. I also create a landing page on MailChimp for my Street Team to sign up to help me promote this book. I create .pdf and .epub ARCs of the book for my Street Team and upload those to the book page on BookFunnel.
Then I write drafts of the newsletters I’ll be sending to my Street Team. I usually send a total of six emails: 1) certified emails from BookFunnel to all the Street Team members with the link to upload the ARCs of the book, 2) a follow-up email from MailChimp to make sure they got the email from BookFunnel, 3) an email when the paperback version is live and a link for them to review the book, as well as a link to a media kit if they need it and a special Street-Team-only sale price of the paperback book, which goes up to normal price in a week, 4) an email when the ebook version is live which includes the review link and a special Street-Team-only sale price of the ebook, which goes up in 3 days, 5) an email on the official launch day of the ebook, including a review reminder and a thank you, and 6) an email one month after the launch day with another review reminder and thank you.
If I had ideas for blog posts about the book, I’ll also write those at this point. For example, I knit the shawl worn by a character in book 2 in my series, so I wrote a blog post about the knitting pattern and scheduled it to post on my blog just before the ebook release date. I also wrote a blog post with a story about how I chose the cover photo, and another blog post with a recipe for the treacle buns that one of the characters likes in the book. I schedule blog posts announcing when the paperback version is live, and when the ebook version is live.
Stage 10) (Updated) After I get the corrected manuscript back from my proofreader, I start the clock on the release schedule of the book. I set appointments in my digital calendar so that I’ll get a reminder for time-sensitive things I have to do, like when I have to upload the .epub on KDP or change the price of a book.
I schedule the first newsletter to be sent announcing the book will release by the next newsletter and call for Street Team signups. After the signup deadline, I send the ARCs to my Street Team.
I input the corrections from my proofreader and then create the final .epub and paperback interior .pdf file of the book. Once I have the page numbers for the paperback interior .pdf file, I send that plus the back cover description and barcode to my graphic designer, who creates the paperback cover.
About 3 weeks before the official launch date of the ebook, I upload the paperback and it goes live on Amazon at a special Street Team only price. I send my Street Team email with the paperback review link and the special price. This allows them to post reviews of the book before the ebook releases, and many of them like to buy the paperback at the discounted price if they enjoyed the book a lot. A week later, I change the paperback price to the regular price.
I register the copyright for the book as soon as I submit the paperback to Amazon. When the paperback finally goes live on Amazon, I add the book to my Author Page at Amazon Central, and I put the Amazon link for the paperback on the book page on my website.
1 week before the “official” launch day for the ebook, I upload the final .epub to KDP (and other ebook distributors if I’m publishing the book wide). I used to do a short 1-week preorder, but since a lot of authors were starting to have issues with the preorders on Amazon, now I just make the book live 1 week before the stated launch day and I don’t mess with preorders anymore. It just saves me a lot of stress. The price is set at a special Street Team only price, and I send an email to my Street Team with the ebook review link and the special price. Three days later, I increase the price a little to a Newsletter-only price.
I schedule a newsletter to be sent on the “official” launch day with the link to the ebook and the special Newsletter-only price. I also schedule to send a launch day email to my Street Team with a reminder to review. A week later, I increase the price of the ebook to regular price. I also schedule a Street Team email to be sent a month later, with a last review reminder and a thank you.
That’s my complete process from start to publication. I’m on Stage 2 in my book creation process with my Lady Wynwood’s Spies series.
***
I got some good work today. I finished Snowflake step 4 on volumes 4 and 5, and came up with some good fixes for a few plot problems I had.
I’m a little worried about the length of each volume in the series. The first 4 volumes will probably all be about 90-100k words each, and I didn’t want to write books that long. Later I’m going to have to go through and see if I can trim extraneous scenes that don’t advance the characterization or the overarching series mystery.
Time spent writing: 3 hours, 6 minutes
Time spent doing other writing-related business: 2 hours, 58 minutes
My takeaway for today: Listing out exactly what I’ve done (what Snowflake steps I’ve completed for each book in the series) was really helpful for knowing what I ought to focus on.
After going for a short walk and then making lunch, I “cleared the deck” again by checking my email inbox. I usually only check it once a day, and sometimes I actually forget to check my email for the day so sometimes it’ll have a couple days backlog. I try to get this stuff done before writing because otherwise it’ll bother me and distract me from writing.
I got an email from my translator about adjusting the formatting for Sushi for One a little more, and I also got the cover back from my graphic designer for the Japanese version of Sushi for One. It looks great! She also went ahead and did the ebook covers for the other two books in the series, Only Uni and Single Sashimi, so that all three covers have the same style and look. The covers look fantastic! She asked my opinion on some titling formatting, and I also sent the cover to my translator to take a look at.
Now that my email and the Sushi for One stuff is out of the way, I can get back to outlining my series. Unfortunately it took a long time, which cuts even more into my writing time today.
My book creation process:
It occurred to me while I was walking that I jumped into this diary without a point of reference as to where I actually am in my writing process. This is how I write a book, and other writers will be different:
Stage 1) I usually start with the characters. I write the backstory and family first, and I jot notes in a file in Scrivener as I think about everything that comes to me about them.
This part will often take months, if not years, as a character slowly comes to me. I will work on the characters for a week or two, then put the project away. Then a few weeks or months later, work on it again.
I will usually put off naming them until I know a bit more about them (for the longest time, the four heroines in my Sushi series were Characters A, B, C, and D). Once I have a slight grasp on their personalities and maybe how they look visually, I’ll come up with a name.
I used to be more arbitrary about names and just name a character by going with my gut, but since I started writing Regencies I’ve been more careful about names because it really would be kind of rude to name a character after an actual member of the peerage who might be alive, or whose family might be offended at the fictional character named after their ancestor. I just think about if someone I don’t know named a character Camy Tang who is nothing like me, and I think it would irk me a little.
For my contemporary romances, I don’t have to worry about that, but the process I developed in naming my Regency characters has carried over to this genre, too. I will look at the character’s personality and think up some key words, and then try to find a first and last name that fits those keywords. But occasionally I’ll just pick a name which I like the sound of.
I typically work on the character until I’ve pretty much exhausted that initial bolus of ideas about them. I will usually write a bit on their internal or spiritual conflict, and also the romantic conflict between the hero and heroine.
Stage 2) Next I work on the plot and the external conflict. This is harder for me and I usually get inspiration from outside events or movies or TV shows. I use the Snowflake method of plotting, starting from large scale events and then slowly going deeper into more detail.
For Snowflake step 2 (1-paragraph summary of the book’s plot), I put all the paragraphs for all the volumes in a file in Scrivener titled “1-paragraph summaries.” Then for Snowflake step 4 (writing a one-page synopsis for each book), I put all the synopses in a single file titled “Entire series plot.” When I do Snowflake step 6 (write an expanded synopsis for each book), each book’s expanded synopsis is in it’s own file.
In my Lady Wynwood’s Spies series, I was all over the place in terms of plotting, so I decided to write down what I’ve done so far, so that I know what I need to do:
Volume 1: written
Volume 2: I’ve done through Snowflake step 6 and started on Snowflake step 8 as well as writing a few chapters
Volume 3: Snowflake step 6 is partly done
Volume 4: Snowflake step 4 is mostly done
Volume 5: Snowflake step 4 is only partly done
The rest of the books: I’ve done Snowflake step 2
Yesterday, I was working on Snowflake step 6 on volume 3. However after listing all this out, I realized that I should finish Snowflake step 4 for all the books in the series first so that I have a more comprehensive overview of the entire series. So today, I’ll do Snowflake step 4 on each book in the series from volume 4 on.
Stage 3) After finishing Snowflake step 6, before starting Snowflake step 8, I’ll go back and make sure the book has a cohesive internal/spiritual arc and a strong romantic arc. I plan the spiritual and romantic arcs at this stage so that I can be sure they flow well in the story.
I know lots of romance authors who can’t do this because it’s too much plotting or too detail-oriented, and I totally understand where they’re coming from. But personally, I have a hard time writing the romantic arc in a book without plotting it out, and I can’t edit a romantic arc very well in a written manuscript. So I do this step because I know that otherwise, my spiritual and romantic arcs will be weak and/or disjointed.
Stage 4) I’ll usually make one Hero’s and one Heroine’s Journeys spreadsheet for the series. Each spreadsheet has one column for each main protagonist, and each cell is a stage in the Hero or Heroine’s Journeys. My Heroine’s Journey follows the regular Heroine’s Journey, but my Hero’s Journey spreadsheet is a hybrid of the external events and the heroes’ internal journeys. I have read lots of books on both Hero’s and Heroine’s Journeys, but my favorite is 45 Master Characters, Revised Edition: Mythic Models for Creating Original Characters, and in my spreadsheet I use an adjusted version of her descriptions of each stage of the journeys.
This is to make sure each protagonist’s spiritual journey has a strong arc through their particular book (if each book in the series is a stand-alone) or through all the books in the series (if each book is not stand-alone). I use the spreadsheet as a very broad overview to make sure I have the vital elements from each journey for each character.
Stage 4b) (Updated) If I’m doing a series, at this point I will also fill out a Series Character Overview spreadsheet for each character in the series (or at least for the characters whose books I’ve plotted so far). My Series Character Overview spreadsheet is very simple, but it gives me a quick glance at each of the characters’ external, spiritual, and romantic conflicts.
I have one column that has:
Archetype
Job
Wound/unerasable sin
Background/Ordinary World
Spiritual conflict
Needs to learn
Scripture
Doesn’t want to be with him/her because:
Needs him/her because:
External goal
External conflict
Villain
Inciting Incident
Disaster 1
Disaster 2
Disaster 3
Why am I passionate about this book?
Then to the right of that column, I have one column per character and I fill in those factors. For the “Villain” and “Why am I passionate about this book?”, I will often have the same answer for both the hero and heroine of a single book, but the other cells are usually specific for each character.
My Series Character Overview spreadsheet actually is very much like a combination of Snowflake steps 3 and 5, except in spreadsheet format rather than a paragraph. I also have one file in Scrivener for each of my characters' information, but my Series Character Overview spreadsheet is more of a summary of the main characters in the entire series.
Stage 5) (Updated) At this point, my plotting and outlining goes into overdrive, which is way more than what most writers do. I’ll do Snowflake step 8 and make a scene spreadsheet, and at the same time I usually do some blocking (explained below).
The scene spreadsheet of Snowflake step 8 is an important step for me because I also list what scenes will be in what character’s point of view, and when in the story timeline each scene happens. I will also do an extra step and make sure each Scene has a Goal, Obstacle, and Disaster or, if it’s a Sequel, I’ll make sure it has a Reaction, Dilemma, Decision. (These terms are straight from Dwight Swain’s book, Techniques of the Selling Writer. I also wrote articles on Scenes and Sequels on my Story Sensei blog.)
I do this to make sure each scene has a purpose. I don’t want scenes that are rambling or don’t advance the plot.

I also create blocking notes for each scene (one file in Scrivener for each scene). For my writing process, “blocking” is like blocking in a live play. It’s writing a step-by-step description of the details of a scene—where the characters go, what they do, their internal thoughts, ideas for dialogue, etc.—to make it easier for me to write the rough draft.
The concept is the same as the “beats” described in Write Better, Faster, but I call it blocking because “beats” is sometimes instead used to refer to high-level outlining. Blocking is also mentioned (although she doesn’t call it “blocking”) in 2k to 10k.
I started doing blocking notes because when I’m planning out the scenes for Snowflake step 8, more details about the scene will usually come to mind that would make my scene spreadsheet too cluttered. Instead, I started jotting these details down in a file with blocking notes for the particular scene (which is why Snowflake step 8 is combined with my blocking when going through my Book Creation Process stages).
I used to try to separate the Snowflake step 8 (scene spreadsheet) and blocking step, but when doing the scene spreadsheet, I found that I can’t stop myself from coming up with more details, and I want to write that stuff down so I don’t forget it. So I would tend to always do some blocking while I’m doing Snowflake step 8. So now, when I track my writing time, when I do Snowflake step 8, I list it as “blocking” since I’m likely doing some blocking at the same time.
In the past, I would only do a few scenes in the spreadsheet and then start writing. However, now, I’ve adjusted my process to complete the entire scene spreadsheet and most of the blocking all at once before I start writing. I find that my writing tends to be smoother when I’m only doing the writing and not trying to switch mindset to do the scene spreadsheet or blocking.
Stage 6) At this point, I’ll start writing the book. I got a really nice gaming keyboard, which made a HUGE difference in how smoothly and quickly I type.
Before, I would finish the manuscript and (ideally) wait a minimum of 4 weeks before doing the editing. That way when I get back to it, it’s fresher and I have a clear-minded perspective that can more easily start hacking and slashing if necessary. However, now that I’m my own boss and don’t have a publishing house editor expecting my manuscript, I found I have a tendency to procrastinate doing the self-editing.
It’s because I loathe self-editing. Loathe it.
I discovered that it’s easier for me to get myself to do my self-editing if I do it as I write rather than waiting a few weeks after the manuscript is done. The process has been referred to (by other writers) as cycling, and basically it’s starting your workday by first self-editing what you wrote the day before, then moving on to your writing for the day. You end up with a very clean edited draft rather than a typical “rough” draft.
I also experimented with writing fast (I’ve seen it referred to as “vomit writing”) and just leaving notes for yourself in your manuscript rather than pausing to look things up or come up with a better word or phrase when you get stuck. Some writers don’t even correct typos.
However, I discovered that when I edit something that messy, the editing suffers. I’m so concentrated on fixing all the mistakes that I don’t do things like tweak word choices to eliminate repetition or make the prose clearer, I don’t adjust phrases to make it sound more like the particular character speaking it, or any of those little things that tighten and refine my writing.
So now I’ve been writing at whatever pace I feel I can handle. I edit my writing as I go so that the first draft is very clean (this is even before I do a cycling pass the next day). It makes my writing pace much slower, but I feel like the overall quality of my writing is much better.
This method of writing slowly and editing as I go wouldn’t work for some writers, especially if they have issues with editing too much and spending too much time editing so that they never move forward with their writing. Luckily, I don’t have that problem (it’s probably because I loathe self-editing so much), so I usually only work on a sentence or paragraph just until I feel it’s satisfactory, and then I’ll keep writing.
However, if a writer did have those kinds of compulsive self-editing tendencies, I would suggest doing “vomit writing” and just writing without stopping, without correcting yourself. It really forces you to move forward on the manuscript. It’s a method that worked for me during all the years I wrote for Zondervan, Love Inspired, and Guideposts. However, since I was provided with professional editors at those publishing houses, my poor self-editing skills didn’t impact the final product as much. Now I have to rely only on myself, so I adjusted my writing style.
(Note on dictation: I tried doing dictation several times, and I got it to work for me up to a point, but I didn’t fully commit to it and didn’t get successful and productive at it. At some point I’ll try again, but for now, I’m just typing like normal.)
Stage 7) (Updated) I used to contact my graphic designer about a cover for the book after I finished writing it, but I have discovered that it helps me do my marketing if the ebook cover is done BEFORE I finish the manuscript. So I contact my graphic designer about a cover for the book when I start writing and ask about her schedule, and assuming she’s scheduled me in, I contact her again about a month before I think I’ll finish writing the rough draft. My graphic designer, Dineen Miller, is amazing and knows exactly my tastes, so I always really love the designs she suggests.
On a side note, I think that choosing a graphic designer is a very personal decision. There are other designers who are perhaps cheaper, but Dineen got her degree and worked as a professional graphic designer in the advertising and marketing industry for many years before she started doing book covers, so I trust her professionalism. Also I trust her taste, which matches with mine very well, and a designer who really “gets” me is something very valuable to me. I never have to spend a lot of time going back and forth to tweak a cover I’m not really happy with. She usually gets my concept and taste pretty solidly with the first few comps she comes up with.
Stage 8) After finishing the manuscript, I send it to my proofreader, Judy, who is way more detail-oriented than me. She’s inexpensive but very good.
If I wanted the manuscript to be perfect, I’d send it to another proofreader after the first one is done, and possibly a third proofreader after that, but I just don’t have the money for that. My proofreader Judy does a good job and I personally don’t see any errors after she’s done, which is good enough for me.
Stage 9) (Updated) When I send the book to my proofreader, I start doing as much of the self-publishing busywork as I can ahead of time. I have a huge To Do list that breaks everything down into small, manageable chunks, which also ensures I don’t forget anything important.
In fact, I have also started doing a little bit of marketing every day, and so I do some of the following even before the manuscript is completed. The To Do list helps with that, because I can just do one small task each day.
Even though I’m usually a bit brain-dead the week after I finish a manuscript, I have discovered (the hard way) that it’s much easier to do some of these things (like writing the back cover description) when the story is still fresh in my mind, and the majority of these marketing tasks can be done well ahead of the actual deadline for each task.
By the time the manuscript is done I should have received the ebook cover for the book from my graphic designer. I write the reader letter and back cover description of the book while the story is still fresh in my mind, and I create a page for the book on my website and upload the cover and back cover description. Then I register the ISBN numbers for the ebook and paperback versions, and create a barcode for the paperback cover. I determine the categories and keywords for Amazon (which can sometimes take a few hours).
I usually send a newsletter out the 2nd Wednesday of every month, so I schedule the release date of the book to be announced in the second newsletter I will send after I expect to get the book back from my proofreader. So for example, if I expect to get the book back from my proofreader on March 1st, I’ll schedule the release date for the 2nd Wednesday of April.
I write drafts of my next two newsletters ahead of time. The first newsletter announces the book will be releasing the following month and calls for Street Team signups, and the second newsletter announces the book is released and gives a special newsletter-only discounted sale price, which will go up to normal price in a week’s time.
I put together my media kit for the book, which includes a high-resolution ebook cover, the ISBNs, a link to the book page on my website, back cover descriptions (a long one and a short one), author bio and headshot, an excerpt of the first chapter, and a list of 5 interview Q&As they can use on their blog if they like. I put the media kit on my Google Drive folder and get the shareable link, which I put on the book page on my website. The media kit is a holdover from when I was writing for my publishers, whose marketing department always asked for stuff like that. Some bloggers will use the media kit, so I always have it available in case they want it.
I create listings of the ebook and paperback book on Goodreads so my Street Team can mark it as To-Read. I also create a landing page on MailChimp for my Street Team to sign up to help me promote this book. I create .pdf and .epub ARCs of the book for my Street Team and upload those to the book page on BookFunnel.
Then I write drafts of the newsletters I’ll be sending to my Street Team. I usually send a total of six emails: 1) certified emails from BookFunnel to all the Street Team members with the link to upload the ARCs of the book, 2) a follow-up email from MailChimp to make sure they got the email from BookFunnel, 3) an email when the paperback version is live and a link for them to review the book, as well as a link to a media kit if they need it and a special Street-Team-only sale price of the paperback book, which goes up to normal price in a week, 4) an email when the ebook version is live which includes the review link and a special Street-Team-only sale price of the ebook, which goes up in 3 days, 5) an email on the official launch day of the ebook, including a review reminder and a thank you, and 6) an email one month after the launch day with another review reminder and thank you.
If I had ideas for blog posts about the book, I’ll also write those at this point. For example, I knit the shawl worn by a character in book 2 in my series, so I wrote a blog post about the knitting pattern and scheduled it to post on my blog just before the ebook release date. I also wrote a blog post with a story about how I chose the cover photo, and another blog post with a recipe for the treacle buns that one of the characters likes in the book. I schedule blog posts announcing when the paperback version is live, and when the ebook version is live.
Stage 10) (Updated) After I get the corrected manuscript back from my proofreader, I start the clock on the release schedule of the book. I set appointments in my digital calendar so that I’ll get a reminder for time-sensitive things I have to do, like when I have to upload the .epub on KDP or change the price of a book.
I schedule the first newsletter to be sent announcing the book will release by the next newsletter and call for Street Team signups. After the signup deadline, I send the ARCs to my Street Team.
I input the corrections from my proofreader and then create the final .epub and paperback interior .pdf file of the book. Once I have the page numbers for the paperback interior .pdf file, I send that plus the back cover description and barcode to my graphic designer, who creates the paperback cover.
About 3 weeks before the official launch date of the ebook, I upload the paperback and it goes live on Amazon at a special Street Team only price. I send my Street Team email with the paperback review link and the special price. This allows them to post reviews of the book before the ebook releases, and many of them like to buy the paperback at the discounted price if they enjoyed the book a lot. A week later, I change the paperback price to the regular price.
I register the copyright for the book as soon as I submit the paperback to Amazon. When the paperback finally goes live on Amazon, I add the book to my Author Page at Amazon Central, and I put the Amazon link for the paperback on the book page on my website.
1 week before the “official” launch day for the ebook, I upload the final .epub to KDP (and other ebook distributors if I’m publishing the book wide). I used to do a short 1-week preorder, but since a lot of authors were starting to have issues with the preorders on Amazon, now I just make the book live 1 week before the stated launch day and I don’t mess with preorders anymore. It just saves me a lot of stress. The price is set at a special Street Team only price, and I send an email to my Street Team with the ebook review link and the special price. Three days later, I increase the price a little to a Newsletter-only price.
I schedule a newsletter to be sent on the “official” launch day with the link to the ebook and the special Newsletter-only price. I also schedule to send a launch day email to my Street Team with a reminder to review. A week later, I increase the price of the ebook to regular price. I also schedule a Street Team email to be sent a month later, with a last review reminder and a thank you.
That’s my complete process from start to publication. I’m on Stage 2 in my book creation process with my Lady Wynwood’s Spies series.
***
I got some good work today. I finished Snowflake step 4 on volumes 4 and 5, and came up with some good fixes for a few plot problems I had.
I’m a little worried about the length of each volume in the series. The first 4 volumes will probably all be about 90-100k words each, and I didn’t want to write books that long. Later I’m going to have to go through and see if I can trim extraneous scenes that don’t advance the characterization or the overarching series mystery.
Time spent writing: 3 hours, 6 minutes
Time spent doing other writing-related business: 2 hours, 58 minutes
My takeaway for today: Listing out exactly what I’ve done (what Snowflake steps I’ve completed for each book in the series) was really helpful for knowing what I ought to focus on.

Comments
Post a Comment